ServiceNow can be added as a ScalePad integration to sync your clients, hardware, people, tickets, time entries, contracts, and opportunities from ServiceNow into Lifecycle Manager. This article covers the steps required to add ServiceNow as an integration.
Note
As you connect integrations, review which clients will sync into the platform. Imported clients count toward your purchased account limit, and many integrations may sync all clients by default. We will notify you when you are close to exceeding your client limit.
Who can use this feature?
- ScalePad Hub Administrators
- Users with Manage Sync Settings permissions in their ScalePad Hub account.
What you'll need
- Administrator credentials for ServiceNow.
Step 1: Creating a ServiceNow integrator account
Lifecycle Manager connects to ServiceNow using the Table API over REST, authenticated with Basic Auth using your integrator account's credentials.
One-Way Sync permissions
Grant read access, including record-level visibility (ACL/RLS), to the tables below.
- sys_choice, required no matter what you sync. It stores the readable labels behind ServiceNow's dropdown values, like ticket or hardware status, so Lifecycle Manager can show them correctly.
Clients
- core_company
- customer_account
- cmn_department
- cmn_location
- domain
only if you choose ServiceNow domains (rather than another attribute, like company names) as the source for Organization names in Step 2 below.
Hardware
Note
Verify that the cmdb_ci table includes access to sys_class_name table.
- cmdb_ci
- cmdb_ci_hardware
- cmdb_ci_vm
- Plus each cmdb_ci_* child table containing devices you want to sync, such as cmdb_ci_hardware, cmdb_ci_vm, cmdb_ci_computer, cmdb_ci_server etc.
- cmdb_model
Software
- Read access to the Application table
People
- sys_user
- sys_user_group
Tickets
- task
- sys_journal_field
- task_sla
Time Entries
- task_time_worked
Contracts
- sn_pss_core_service_contract
- sn_pss_core_service_contract_line
- contract_sla
Opportunities
Which tables you need depends on which ServiceNow module you use for opportunities:
- If you use the core Opportunity_Management module:
- sn_opty_mgmt_core_opportunity
- sn_opty_mgmt_core_opportunity_line_item
- If you use Customer Service Management (CSM) opportunities:
- sn_csm_opportunity
- sn_csm_opportunity_item
Two-Way Sync permissions
For more details on how Two-Way Sync works, see Introduction to Two-Way Syncing.
All One-Way Sync permissions above, plus write access to the following cmdb_ci table fields:
- purchase_date
- warranty_expiration
Step 2: Adding ServiceNow as a ScalePad integration
- Log in to ScalePad at app.scalepad.com.
- In the ScalePad Hub, click Integrations.
- Click the Add Integration button.
- Use the search bar to find ServiceNow and click the ServiceNow tile.
- Enter the required details:
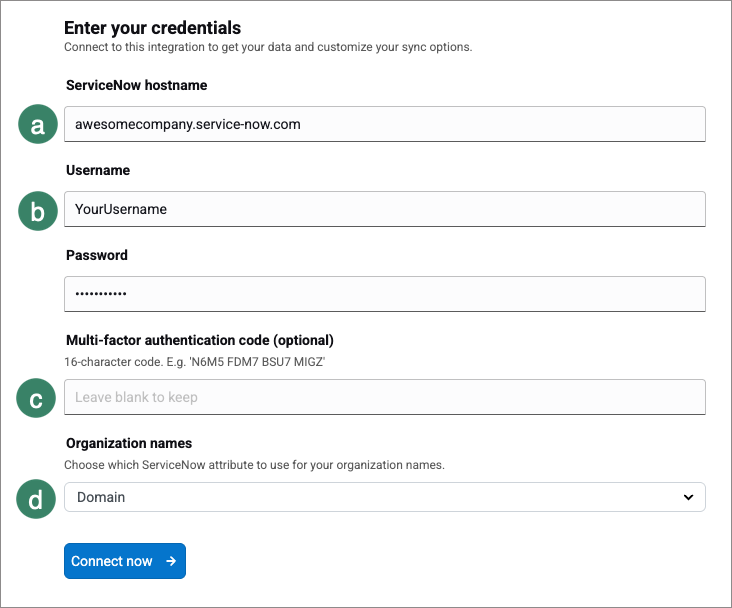
- Enter your ServiceNow hostname (see Base URL below).
- Enter your integrator account's Username and Password.
- Enter a Multi-factor authentication code (optional).
- Under Organization names, choose which ServiceNow attribute to use for your organization names.
- Click Connect now. Lifecycle Manager runs an initial sync to discover your ServiceNow data.
Base URL
Your ServiceNow instance hostname, with no https:// or trailing path, for example, awesomecompany.service-now.com.
Step 3: Setting your sync preferences
Once the initial sync from Step 2 finishes, your sync preferences become available.
- Under Preferences > Two-Way Sync, select the checkboxes for the fields you want Lifecycle Manager to write back to ServiceNow (optional): - Warranty Expiration Date - Purchase Date
- Under Preferences > Hardware, select Sync assets without serial numbers (optional).
Some information may be unavailable for assets synced without a serial number. - Under Configuration item hardware status, select the checkboxes for the hardware statuses you want to sync. We'll only sync configurations with the selected statuses. Available options depend on your ServiceNow instance's configured values.
- Under Configuration item install status, select the checkboxes for the install statuses you want to sync. We'll only sync configurations with the selected statuses.
- Under Configure fields > Hardware, review the automatic mapping of your ServiceNow configuration item tables to ScalePad hardware types, and adjust any mappings as needed.
- Click Save and sync now to save your preferences and run a new sync, or Save to save your preferences without syncing immediately.
Any questions?
Reach out to our Lifecycle Manager support team by submitting a support ticket.
:sparkles: NEW :sparkles: Join our MSP Power-Ups
Free 15-minute micro-workshops + live Q&A with our Lifecycle Manager experts. Sign up here to reserve your spot.